African violets are my favorite houseplants due to their profuse and reliable flowering. Besides that, the lush and vibrant foliages create a tropical vibe in my indoor space.
It took me months to learn how to propagate African violets from seeds, leaf cuttings, and division. Each of these African violet propagation methods has its advantages and disadvantages.

As an Amazon Associate I earn from qualifying purchases.
Propagating African violets in soil may sound simple, but you should learn one or two things. In this article, we’ll explain different methods and steps for propagating African violets.
3 Top African Violet Propagation Methods
African violets are exotic flowering plants that come in several colors. If you want more African violets, there is no need to buy new ones. Here are three simple methods for propagating African violets.
African Violet Propagation from Seeds
Propagating African violets from seeds is a no-brainer task. But these tiny seeds will require a couple of specific growing conditions to sprout. Below are quick steps for propagating African violets in soil:
Step 1: Prepare Potting Medium
African violets thrive in light and well-draining soil. Prepare a mixture of peat, vermiculite, Epsom salt, and greensand. Epsom salt helps lighten the potting medium, and peat moss holds moisture.
Step 2: Water the Rooting Medium
Add distilled water or rainwater to the potting medium to clump together. Ensure the mixture does not become soggy after adding water.
Step 3: Fill Your Pots with the Medium
Fill 2-inch size pots with rooting medium and use a pencil to poke holes through it. The holes will be the spot for placing the tiny seeds.
Step 4: Plant the Tiny Seeds
Place the holes in the holes and cover them with light soil. Let the seeds use the available moisture to germinate.
Step 5: Provide African Violet Care
Place the pots near an area with bright indirect sunlight and maintain a consistent indoor temperature. It will take about 8-14 days for the seeds to germinate.
African Violet Propagation from Division
Mature African violets develop pups or suckers for easy propagation. Below are quick steps for propagating African violets using the division method:
Step 1: Prepare Potting Medium
African violets thrive in light and well-draining soil. Prepare a mixture of peat, vermiculite, Epsom salt, and greensand.
Step 2: Add Water to the Medium
Water the rooting medium to clump it together. We recommend using distilled water or rainwater and ensuring the rooting medium is not soggy.
Step 3: Fill the Pots with the Potting Soil
Fill the pots with the rooting soil and poke holes using a pencil or sharp object through the medium. Ensure your containers have drainage holes at the bottom to eliminate excess water.
Step 4: Identify a Mature and Healthy Plant
Identify a mature and healthy African violet from your collection. Ensure the chosen plant has several pups or suckers with tiny root hairs.
Step 5: Separate the Pups or Suckers
Separate the pups from their parents and spray them with insecticidal soap to eliminate any mites before planting.
Step 6: Plant the Pups in Each Pot
Plant the suckers in the holes and stack the rooting medium around the base to provide support. Provide bright indirect sunlight and consistent indoor temperature to enhance a faster growth rate.
African Violet Propagation from Leaf Cuttings
Leaf cuttings are my favorite method for propagating African violets. Here are quick steps for propagating African violets from leaf cuttings:
Step 1: Prepare Potting Mix
African violet leaf cuttings prefer a light and well-draining rooting medium. We recommend mixing equal parts of perlite with African violet potting soil.
Step 2: Add Water to the Potting Mix
Add distilled water or rainwater to the potting mix to create a clump. Ensure water is not too much to create a soggy environment.
Step 4: Fill the Pots
Fill the pots with the rooting medium and use an unsharpened pencil to poke holes through them. You will need these holes when planting the leaf cuttings.
Step 5: Choose the Leaves
Identify healthy leaves on your African violet plant for propagation. Ensure the leaves do not have signs of pests and diseases. Consider the middle rows of leaves for your cuttings.
Step 6: Prepare the Leaves
Shorten the leaf petiole to about an inch using a sharp and sterilized knife. Shortening the leaf stems will help avoid rotting while rooting.
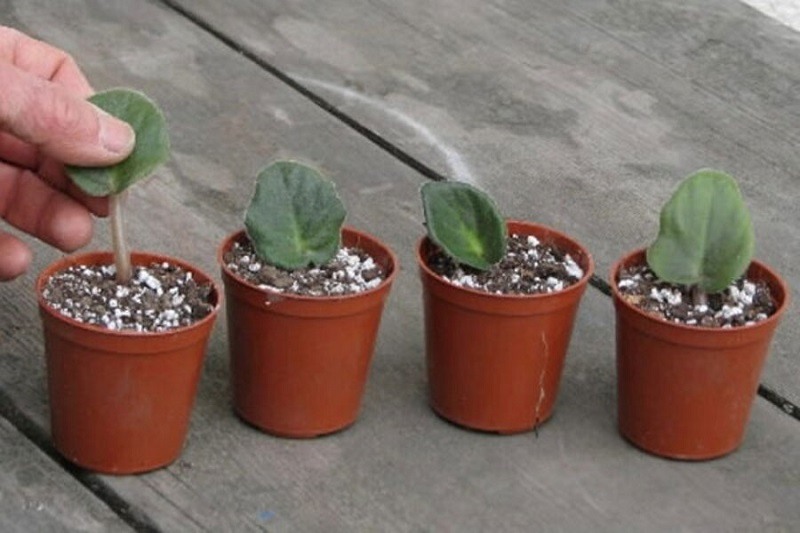
Step 7: Plant the Leaf Cuttings
Apply rooting hormone on the leaf stem ends to facilitate faster root development. Be sure to wear protective gear since the rooting powder is a mild irritant. Pot up the leaf cuttings in the small holes.
Step 8: Provide Support
Use plastic tags to provide support to your potted leaf cuttings and prevent them from collapsing into the soil.
Step 9: Create a Mini-Greenhouse
Place the potted leaf cuttings into clamshell containers and close the lid tight. Ensure all the leaf cuttings fit in the containers well. The clamshell containers create a warm and humid environment.
Step 10: Transplant Your New Violets
Provide ultimate African violet care for the leaf cuttings to develop roots. New African violets will develop after 8 weeks and are transplanted when they reach two inches. Plant each in a small pot size filled with African violet potting soil.
My Final Thoughts
The above African violet propagation steps are easy to comprehend. Take the time to read through each method and choose the best option that suits your needs. Be sure to provide ultimate care to your new African violets for successful growth.
If you have read up to this point, I can guess you have been struggling to develop new African violets for your indoor plants collection. Feel free to share this information with your friends or family members.
People Who Read This Also Read: